Sunday, April 28, 2013

Oatmeal Cookie Bites


Everyone loves homemade cookies, especially chewy bite sized nibbles. These are not just delicious but  are also gluten free for those who are gluten sensitive, or just for those who want to try eating gluten free sometimes for whatever health reason.  These cookies are made from  finely ground oats which makes them extra chewy.  If one is also on a casein free diet, just replace the milk chocolate with an equal amount of nuts or raisins.  What I like about this recipe is that you don’t have to go to a special health food store for the ingredients.  Non-dairy milk such as rice milk or almond milk is available at big supermarkets nowadays.   I suggest doubling the recipe because they disappear quickly on hungry little (or big ;) ) mouths.

If you have older children, you can make this uncomplicated  recipe with them.  It would be a great idea to let them know  at an early age what goes into a healthful cookie. Might be a bit  messier to bake with kids but  the priceless bonding will be worth it.
With all the  good nutrition in these cookies: soluble fiber from oats and B vitamins  and minerals such as potassium and zinc from coconut sugar and antioxidants from raisins, you won’t feel guilty serving these treats to your loved ones or to yourself : ).  These are also low in sugar.  Enjoy munching without the guilt!


Oatmeal Cookie Bites
Based on a recipe by Katie
Yield- 20 bite sized cookies (1 ½ in each)

Ingredients:

140 grams oat flour  (grind rolled oats in blender or food processor)
½ teaspoon salt
½ teaspoon baking soda
¼ cup chocolate chips or cubed milk chocolate bar
¼ cup raisins
2 Tablespoons Coconut sugar or brown sugar or muscovado sugar
2 Tablespoons melted butter
½ teaspoon vanilla
2 Tablespoons milk (I used coconut milk for drinking but you can use almond milk, rice milk, or cow’s milk)


Directions:

1. Preheat oven at 375 F
2. Mix  oat flour, salt, and baking soda in a bowl. Set aside.
3. In a separate bowl, mix melted butter, vanilla, milk, and sugar.
4. Stir in chocolate chips and raisins. Batter will be thick.
5. Form into 1 ½ inch balls  on an ungreased pan. (Doesn’t matter if you line them with
    parchment paper or not)
6. Bake for 6 minutes for a soft chewy  cookie or bake for 7-10 minutes for  a crispy cookie. 
    Cool before munching on them. 


Beef and Vegetable Samosas


I’m in love with Indian food.  I adore the use of spices in such quantity and with such vivid imagination.  Indian food with its variety of spices is not just a gustatory delight, but is also of great mystical interest.  Entering an Indian restaurant gives you a peek of India’s history and culture with its rich and exotic interiors.  Even streamlined Indian restaurants show subtle hints of  a  unique and exciting culture just by  simply using intricate wall paper.  Unfortunately, Indian cuisine unlike Thai, Japanese, and of course Chinese cuisine is not that popular yet in Metro Manila.  I live in the North, and chances of finding a good Indian restaurant is like finding a needle in the haystack. Luckily for me, my Indian food craving can easily be subsided by an easy to make yet richly spiced Beef and Vegetable Samosas.

Traditional Indian Samosas are crispy triangle parcels of spiced potatoes and peas, and or ground beef. They are made with pastry dough and formed into triangles.  I find it easier and more convenient to use lumpia wrappers and wrapping them into classic rectangular shapes. It doesn’t matter which way you shape them—what matters is the explosion of flavors in your mouth. Flavorful Indian  spices  such as coriander, cumin, turmeric, and chili  are absorbed by the soft and almost mushy potatoes.  Flavorful and crunchy, these treats are going to be a welcome addition to your daily eats or special occasions.   No need to go to an Indian specialty store because these spices are readily available at big supermarkets.  You can make it completely vegetarian by replacing the meat with a couple more of potatoes. Prefer a fiery version? Just add more chili powder.


Wrapped and uncooked samosas freeze well for several months.  No need to thaw before frying.   Serve with the familiar sweet chili sauce, tangy tamarind sauce (I found this at SM...just add a little sugar into it),  or plain creamy yoghurt.  You may even want to  serve these Indian goodies with  two or three  of these sauces for a variety of flavors. These samosas are ideal for appetizers, snacks, side dishes, and are a meal by itself.

Beef and Vegetable Samosas (Lumpia style)
Yield: 40 (3 inch) pieces

Ingredients:

1 ½ cups cubed potatoes (1/2 in cubes), boiled till tender
1 ½  teaspoons cumin
½ teaspoon turmeric
1 teaspoon ground coriander
1 inch grated ginger
1 medium onion, diced
2 cloves garlic, minced
¼ kilo ground beef
1 cup green peas
¼ cup (or more!) chopped coriander (cilantro) leaves
5 x 5 lumpia wrappers (about 40 pieces)


Directions:

1. Heat in a medium pan (big enough to fill all the ingredients), all the spices-cumin,
    turmeric, and coriander for a couple of minutes until fragrant.
2. Add 2 Tablespoons oil, then add the ginger. Saute for a few minutes.  Add garlic and
   onion. Mix well.
3. Mix in beef, and cook till beef is no longer pink.
4. Add in cubed cooked potatoes. Season with salt and pepper. Toss in  fresh  coriander
    leaves. Cool mixture before wrapping in lumpia wrappers.
5. Get a piece of lumpia wrapper and put 1 tablespoon of the filling. Wrap lumpia style.
6. Heat some oil, and fry until golden brown. Remember that the filling is already
    cooked. You just need to brown the wrappers.  Turn once to brown the other side.
7.  Serve with desired sauce.


Squash Soup with Crab Stick and Corn


Squash or Kalabasa as what we Filipinos call it is a highly nutritious plant which is readily available in local markets or supermarkets all year round. Although we think of it as a vegetable, squash is really a fruit because it came from the plant’s seed itself. With its affordability and availability in the Philippines, why not use it beyond our traditional pinakbet or ginataang kalabasa dishes? By using it more often in our everyday meals, we can be assured of meals with  high levels of vitamin A (better eyesight), folate (prevention of birth defects), vitamin C (stronger immune system), not to mention other valuable antioxidants  vital to our bodies.

If you are tired of  your everyday meals, try making squash into soup.  Just throw in whatever vegetable, meat, or seafood that you have.  You won’t be needing any fancy equipment here, not even your old trusty blender. …Yup, this means no gadget or appliance to clean. Even a blender sometimes can be tiresome to clean especially when added to your pile of “basic” pans and plates J. This recipe freezes well—just hold off the milk or cream until serving time.

Kids will love this sunny colored creamy soup while the adults and the elderly will love its nutritional benefits. Try this recipe and watch it be immediately gobbled up.


Squash Soup with Crab stick and Corn
Yield: 4 cups

Ingredients:

  • 500 grams squash (cut into cubes and boiled in 1 ½  to 2 cups water, mashed with a fork  together with boiling liquid)
  • 100 grams crabstick (about 7 pieces)
  • half a can of corn kernels
  • 2 garlic cloves, minced
  • 1 medium onion diced
  • 1 chicken cube or  (½ chicken cube plus 1 Tablespoon fish sauce)
  • 2 tablespoons butter
  • ¼ cup evaporated milk or cream (optional)
  • salt and pepper to taste

  • 1 Tablespoon cornstarch dissolved in ¼ cup water (tap water)(optional)


Directions:

1. Over low heat, melt butter in a medium pan.
2. Saute garlic and onions until onion are transparent.
3. Pour in mashed squash together with the water boiled in it.  
    Increase heat and allow to simmer.
4. Add in chicken cube and or fish sauce. Mix well. Add salt and pepper to
    taste.
5. Throw in some crab sticks and corn kernels. Simmer a few minutes until
    crab sticks are thoroughly heated. (You can also opt to just top the soup
    with crab sticks and corn kernels.
6. If mixture is not thick enough, add cornstarch dissolved in water and
    simmer again for 5 minutes.
7. If using milk or cream, add now and simmer for a few seconds.


Fudgy Chocolate Crinkles


Chocolate crinkles are fudgy chocolate cookies coated in confectioner’s sugar. These crackled-looking cookies are a favorite during Christmas because of their snowy appearance.  The melt in your mouth chocolatey goodness also makes them popular all year round.

This recipe uses vegetable oil or palm oil which makes the cookies fudgier than making them with butter. Also, when eaten cold straight from the refrigerator, these  cookies  transform into  such comforting delights.  They don’t harden but just firm up into the right soft, chewy, and fudgy texture that make them so addicting.

The secret here is not to over mix the cookie dough.  You also have to refrigerate the dough, or better yet freeze the dough overnight so the dough is thoroughly chilled.  By doing so, the center of the cookie would remain fudgy.  You might find this recipe a bit messy to make, but I assure you that it is worth ever hassle. Use plastic gloves when forming the dough into balls.

I sold a lot  of chocolate crinkles using the exact recipe many years ago. I have scaled down the ingredients --I’m pretty sure you won’t be interested in making  hundreds of cookies from a single recipe no matter how yummy they are.  Since this was once a commercial recipe producing hundreds of cookies, most of the ingredients were weighed.  You will be needing a weighing scale for this. 

Chocolate Crinkles

Ingredients:

250 grams all purpose flour
250 grams light brown sugar
125 ml vegetable or palm oil
¼ teaspoon salt
4 large eggs
70 grams dutch processed (alkalized) cocoa powder
 (I used Bensdorp. Dutche brand is also fine)
20 grams regular cocoa powder ( I used  Peotraco)
30 grams baking powder
¼ teaspoon baking soda
*confectioner’s sugar or powdered sugar for rolling

Directions:

1. Sift together all purpose flour, baking soda, baking powder, and salt in a bowl.
    Mix well. Set aside.
2. In a heavy duty mixer with paddle attachment and in medium speed, combine sugar  
    and oil. Mix well.
3.  At low speed, Add in cocoa powder. Blend thoroughly.
4.  Increase speed, and beat in eggs one at a time.
5.  Mix in flour mixture in 3 to 4 batches at low speed. Don’t over mix.
6.  Cover with plastic wrap.  Freeze overnight.
7.  Preheat oven to 350 F.
8.  Form dough into 1 inch balls, and roll in powdered sugar.
9.  Put on parchment lined baking sheets, 2 inches part.
10. Bake for 8-10 minutes. Don’t over bake.
11. Immediately transfer to wire racks to cool. Enjoy!


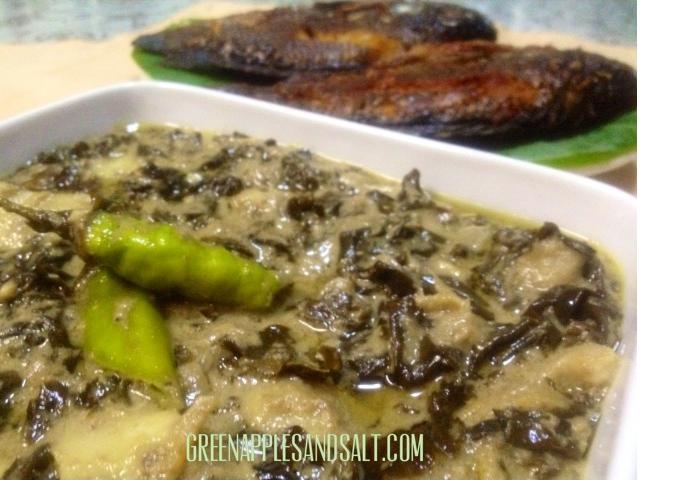
Simple Laing


Laing is a Bicolano dish made up of dried taro leaves, coconut milk, gabi ( taro) with either pork, shrimps , or dried fish.  Bicolanos take pride in this dish together with the other famous and ever so spicy Bicol Express. Taro leaves together with the nutritious coconut milk is such a winning combination. Taro leaves are rich in fiber—for good  digestion, potassium—for maintenance of good blood pressure, vitamin E—for  supple skin, and magnesium—for fighting fatigue. Coconut milk  as we all know now is very healthful because it is rich in lauric acid which is proven to be antibacterial, antifungal, antiviral….Now going back to the laing …  I don’t care much for the addition of dried fish even though  the authentic dish uses dried fish as the major source of flavor. For some reason, I get squeamish with the addition of dried fish in laing. Cooking laing with bottled  bagoong (from the supermarket) as its source of seafood flavor definitely agrees with me.  Bagoong or fish paste when sautéed releases a mild nutty flavor similar to  sautéed canned anchovies. Although I enjoy this  creamy dish very much, it is a relatively  new addition to our family’s meals. I  just started cooking it at home for the past 3 years.  I did not grow up  eating  laing as compared to sinigang or nilaga.  My mother was not  comfortable preparing this dish because of what has been said about the leaves , which when not dried properly, would cause itchiness and allergies. Many years ago, I would just be content eating laing either in Goldilocks or in any Filipino restaurant.

It was not until I became old enough (or just old )  when I realized that laing was such a breeze to make.  The “dreaded” proper drying of leaves was not a problem anymore because dried taro leaves are readily available in most supermarkets nowadays.  A bag of already dried taro leaves is relatively inexpensive, plus you just need a palmful or two    to feed a family of five.  The remaining leaves keep well in the refrigerator, or even at room temperature.

This laing recipe does not contain any meatand or dried fish. I always pair this with fried or grilled tilapia, or with inihaw na liempo or fried chicken.  Since this dish is so tasty yet simple to make, it happens to find itself regularly on our daily meals.

Simple Laing
Yield: 5 servings

Ingredients:

3 cloves garlic, minced
1 small onion, sliced
2 Tablespoons ginger, cut into thin strips
1 or two sili pansigang or finger chili
2 – 2 1/4 cups coconut milk
½  chicken bouillon cube
1 Tablespoon bagoong  or fish paste
2 cups dried gabi leaves (loosely packed), rinsed
1 cup gabi, chopped into 1 ½ inch cubes then boiled until tender
cooking oil

Procedure:

1. In a medium pan over medium heat, heat about 2 tablespoons oil. Saute ginger, onion,  
    then garlic.
2. Add in  bagoong and sauté for a few seconds.  Add in coconut milk, sili pansigang, and  
    ½ chicken cube.
4. When mixture is simmering, add in taro leaves and cooked gabi.. Mix well. Simmer for
    5 minutes or until leaves are tender.
5. Adjust seasonings. You may add fish sauce or more bagoong if you like.


Friday, April 26, 2013

Adobong Pusit


This recipe is my mom’s version of Adobong Pusit.  My mom does not cook that much, but when she does, it definitely turns out to be a winner.

We Filipinos love making adobo dishes. Aside from chicken pork adobo, we love cooking  adobong pusit not just for its taste but also for the availability of its ingredients.  Squid is always available in the market and supermarkets (red tide of course as an exception :( )  Adobo usually  only  requires pantry staples such as soy sauce, vinegar, and garlic. This is a classic Filipino dish and is very easy to make…well okay, except for the cleaning part and going full battle with the removal of  the  squids’ eyes :). But after that, everything is easy peasy.

My mom’s version does not have water in it. The liquid   from this dish is basically simmered down squid ink which means concentrated flavor.  You can choose the cooking time according to your sauce thickness preference. You may want to cook it a bit longer than the 10 minutes cited in the directions for an almost dry adobong  pusit, or you may even want to cook it a little bit shorter than 10 minutes if you want a slightly saucier dish. Either way, this dish is absolutely delicious.  Partnered with hot steaming brown or red rice  (more healthful than white rice of course!), I can assure you of a very happy tummy. 
 

Ingredients:

750 grams small or medium sized squid
 (eyes, membrane or skin, rib part removed but save the ink! )
2 Tablespoons ginger, sliced into strips
1 head garlic, chopped
1 medium onion, chopped
3 Tablespoons Soy Sauce
½ teaspoon ground black pepper
2 finger chili (or sili pansigang)
2 Bay leaves (laurel leaves)
3 Tablespoons Vinegar
cooking oil

Directions:

1. In a pan, heat about 2 tablespoons oil.
    Brown the ginger, then garlic and onions.
2. Add squid with ink, soy sauce, black pepper, finger chili, and bay leaves.
    Mix and simmer for a couple of   minutes.
3. Add vinegar but do not mix right at once so that that the vinegar can cook properly for
    a few minutes. Simmer for 10 minutes on medium heat.
     (You may add 2 tablespoons more oil if you want a shinier looking dish). Yummy!


Vanilla Cupcakes with Perfect Cupcake Frosting


Chocolate  or Vanilla?  Although I absolutely adore  my moist chocolate cupcake, I am a vanilla girl. Vanilla ice cream, vanilla cheesecake, vanilla jelly beans, and of course vanilla cupcakes.  There is something special about these pretty and white confections that  lure me into them.  Perhaps it’s their simplicity.  Vanilla is subtle and elegant compared to chocolate’s strong and bold flavor.  I remember this time when we were at a Mcdonald’s drive-through.  My sister ordered a hot fudge sundae together with her chicken sandwich.  I looked at her and asked  “Seriously?”….She looked at me in a funny way and asked me what the big deal was.  “Nothing” I said.  I told her that I was surprised she ordered a chocolate sundae over the caramel or the plain variety.  Well, it turned out that she was by that time already influenced by her officemates on choosing chocolate flavors over vanilla flavors in sweet treats.  Growing up, we always opted for vanilla instead of chocolate probably because of my mother who associated chocolate or chocolate flavored treats as something unhealthful because they seemed to be loaded with sugar.  I know that the majority would always choose chocolate over vanilla hands down…but hey, to each his own J.

Before you totally label yourself as a chocoholic, just try this recipe—An easy to make batch of moist vanilla cupcakes complemented with an equally easy to make perfect cupcake frosting is a heavenly delight. Like the other baked goodies in this blog, these elegant little cakes are not too sweet, yet they hit the spot for a light sugar craving.  Beginners in baking would love this recipe—since this is not a chiffon cake, no need to separate the egg yolks from the egg whites, then beating the latter to soft or stiff peaks.  No mixing and creaming of butter and sugar until mixture is  light and fluffy. Yey!  In other words, this recipe is so easy to make.  Frost these baby cakes with the Perfect Cupcake Frosting  (recipe follows), and see your family and friends treat you like a queen or rockstar. Or both. 


Vanilla  Cupcakes
(Based on a recipe from Glorious Treats)
Makes 12 cupcakes

Ingredients:

1 ¼ cups cake flour ( 130 grams)
1 ¼ teaspoons baking powder
½ teaspoon baking soda
½ teaspoon salt
2 large eggs (room temperature)
¾ cup granulated white sugar
1 ½ teaspoons vanilla extract
½ cup oil (vegetable or palm oil)
½ cup fresh milk plus ½ teaspoon white vinegar or lemon juice (Set aside for 5 minutes to curdle)

Directions:

1. Preheat oven to 350 F
2. In a medium bowl, sift cake flour, baking powder, baking soda, and salt all together. 
    Mix well. Set aside.
3. In the bowl of an electric mixer, add eggs and beat 10-20 seconds.  Add sugar and  
    continue to beat on medium speed about 30 seconds.  Add vanilla and oil, beat
4. Remove bowl from mixer.  Mix in gently half of the flour mixture using a big rubber 
    spatula or wire whisk. Add half of the milk, then the rest of the flour, and then the rest
    of the milk.  Remember to always beat everything gently until mixture is smooth.
5. Strain mixture into a large measuring cup (I used my 4 cup capacity measuring cup).
6. Pour batter into a muffin pan with paper liners. Fill about 2/3 full.
7. Bake for 12 – 15 minutes. Cool completely on wire racks before frosting)
This wonderful creamy vanilla icing is called by many names such as Flour Buttercream Frosting, Best Buttercream Frosting, Icing made with  Cooked Flour, and many others.
This is a scaled down version which lightly frosts 12 cupcakes.  You may want to double the recipe if you want piled high frosting.

Perfect Cupcake Frosting
Based on a recipe by Our Best Bites)
Yield: Frosts 12 cupcakes

Ingredients:

3 Tablespoons All Purpose Flour
1/2 C milk fresh milk
1/2 C salted butter
1/2 C granulated sugar
1 teaspoon vanilla extract (use the clear vanilla extract so that your frosting stays  white)


Directions:
 
1. Whisk flour and milk in saucepan. Over medium heat,  continue whisking until thick. 
2. Strain mixture. Cool in refrigerator until chilly.                                                             
3. Using a whisk attachment, beat butter and sugar in electric mixer 1-2 minutes until light and fluffy. 
    Use whisk attachment.                                                                                 
4. Add in the chilled milk mixture. Beat on medium to high speed for 7 – 8 minutes, stopping occasionally to  scrape in sides.