Thursday, July 25, 2013

Oatmeal Raisin Cookies


Sometimes you just have to go back to the classics. Like with this Oatmeal Raisin Cookie.  
Crunchy oats with chewy raisins will always be a timeless treat. If you can’t decide between a crunchy or chewy type of cookie, then this cookie is for you. At first bite, the crunch hits you, then a pleasant chewiness follows.  How’s that for a cookie?! :)

When I scour recipes on the internet, I’m always on the look out for  the not too sweet treats or I simply lessen the sugar content of what is originally posted in the recipe.  Sometimes, I fail in just hitting the spot for the desired sweetness. It would  either be still too sweet or  too bland. But not in this cookie.  The original recipe says firmly packed dark brown sugar, but I just lightly spooned some on the cup and simply leveled it off with a knife. Glad I did!

So this is a not too sweet cookie with just the right crunch and chewiness.  Could this still get any better? Yay!  This cookie is packed with the goodness of oats. Because oats are fiber packed, we simply feel full easily and stay full for a long time (If you are trying to lose weight,  then eating oats regularly is a must). Even our daily morning “ritual” goes on easily!  It has also been proven that oats lower blood pressure while lowering bad cholesterol.  

If you decide to make these cookies, I assure you that you won’t regret it.  These cookies freeze well  but you have to reheat it in the oven for several minutes or  in an oven toaster if you want them to still be crunchy on the outside. Enjoy with a tall glass of milk, coffee, or tea. If you have to or  just want to be gluten free,  try the gluten free Oatmeal CookieBites.  Either recipe is delicious and nutritious. Happy munching!


Oatmeal Raisin Cookies
(adapted from Sweet Savory Life)

Ingredients:

1  cup  butter, softened
1  cup dark brown sugar (lightly spooned)
1/2  cup granulated sugar
2  eggs
1  teaspoon vanilla
1-1/2  cups all-purpose flour
1  teaspoon baking soda
1/2 teaspoon baking powder
1  teaspoon ground cinnamon
1/4 teaspoon nutmeg
1/2  teaspoon salt
3  cups oats (I used 1 ½ c rolled oats plus 1 ½ c quick cooking oats)
¾ - 1  cup raisins ( I used just ¾ cup depending on your preference)

Directions:

1. Preheat oven at 350 F.
2. Combine  dry ingredients together- flour,baking soda, baking powder, cinnamon,
    nutmeg, and salt in a bowl. Mix very well.
3. In a separate bowl at medium speed, cream butter and sugars for 3 minutes.
2. Add eggs and vanilla. Beat until well combined.
3. At low speed, add flour mixture to butter/sugar/egg mixture. Mix well.
4. Stir in oats and raisins.
5. For uniform cookies, I suggest using a small ice cream scooper. Or drop by rounded
    tablespoonfuls on parchment paper lined sheets.
6. Bake 12 – 15 minutes or until sides of  cookies are golden brown.
7. Let cookies remain on cookie sheet for 2 minutes, then transfer to a wire rack to cool completely.


Wednesday, May 15, 2013

Goto


Goto is a popular Filipino rice porridge made of tripe. This, together with arroz caldo and lugaw  is a comfort food since it not only warms your belly, but also enlivens your spirit.  Often served  hot,  this  Filipino version of congee is such a delight to eat. It is very filling and can be eaten during breakfast, lunch, merienda, dinner, or as a  snack before going home after partying in the wee hours of the morning. :)

Although Filipinos are very familiar with goto’s taste, we don’t really give much attention to its health benefits, particularly tripe’s health benefits. Do you know that 3.5 oz serving of  beef tripe according to Livestrong.com  provides  11.7 g of protein, or 18 percent of the 65 g Food and Drug Administration daily value and 4 g of fat, or 6 percent of the 65 g daily value; and 1.4 g saturated fat, or 7 percent of the 20 g daily value. This same amount of serving provides 81 mg calcium (for healthy bones and teeth), or 8 percent of the 1,000 mg FDA daily value, 1.7 mg of zinc (for prostate health) or 11 percent of the 15 mg FDA daily value, 11.8 mcg of selenium (to neutralize toxins from the body) or 17 percent of the 70 mcg daily value. Not bad for a  simple, yet delicious and satisfying meal. 

Always make sure that the tripe is very tender when about to be served. A pressure cooker is a must when making this recipe, unless you opt for slow cooking which would take several hours of waiting yet produces the most tender tripe. If you are  like me  who wants to save time and electricity (plus the hungry tummies already at standby mode :) ), then the pressure cooker is definitely your bestfriend.  Don’t forget to save all the broth from the boiled tripe since most of the goto’s flavor will be from this flavorful liquid.

Pair it with lumpia, siopao, puto, or  beef and vegetable samosa and you will definitely be pleased. I am content eating goto on its own but I always have a second serving.:)  Aside from the spring onion and garlic as topping, you can also add crumbled chicharon (pork cracklings) and hardboiled eggs. Yum!

Leftover goto freezes well. Just thaw, then reheat. Add water as needed. Another addition to your freezer meals. : )


Goto
Yield: 5-7 servings

Ingredients:

600 grams tripe, cooked in pressure cooker for 45 minutes or until tender, then cut into 2-3 inch long strips, inch wide)
stock/water from tenderized tripe
1 ½  cup uncooked glutinous rice
1 ½  cup uncooked white rice
2 inch ginger, cut into strips ( 2 Tablespoons)
1 onion, sliced thinly
3 cloves garlic, minced plus more for topping
1 cube chicken bouillon
3 Tablespoon patis (fishsauce)
1 teaspoon (or more) black pepper
1 bunch green onion for garnish
cooking oil

Directions:

1. Heat 2 Tablespoons oil. Saute ginger, garlic, and onion.
2. Add tripe, glutinous rice, and white rice.  Stir for a few minutes.
3. Add about 6 cups of stock/water.  Simmer while stirring occasionally.
    Add more water as needed.
4. When mixture is simmering, mix in bouillon cube, black pepper plus 3 Tablespoons patis.
5. Cook until rice is tender. Add in more water a cup at a time. Mix well.
   (I had to add 2 more cups.)
6. Top with green onion and fried garlic.


Thursday, May 2, 2013

Split Pea Fritters with Easy Curry Coconut Cream Sauce


To those of us who associate legumes  with just  the old reliable  munggo  or mung beans, yellow split pea can be an interesting addition to our legume repertoire. They can be made into healthy soups, savory dishes and  snacks, as well as sweet treats.These little round yellow bits of protein source are native to Southwest Asia. Its is commonly used in Indian and Iranian cuisine.  Luckily fo r us in the Philippines, yellow split pea is available in supermarkets, especially in Metro Manila.

Whether you are gluten sensitive or not, this is another delicious gluten free snack that kids and adults will surely enjoy.  Its crunch is highly appealing.  This unusual treat is protein packed and is very high in fiber. These sunny colored legumes are also high in vitamins such as folate (a B vitamin),  important for production of red blood cells, choline for proper cell membrane functioning,  niacin for turning carbohydrates into energy, and pantothenic acid for the breakdown of protein, carbohydrates, and fats.

A variety of spices can be added such as turmeric, paprika, chili, cumin, etc. depending on  an individual’s preference.  Chopped basil leaves or coriander leaves go well with these crunchy munchies. I used a cup of  chopped  fresh coriander leaves  when I made this the second time and  noticed how fast it disappeared on the plate. ;)  Uncooked patties may be frozen for several months.  Store by stacking them up  (use wax paper between each patty) and   putting them a zip lock bag or freezer friendly food keeper.  No need to thaw before frying.

Split Pea Fritters with Easy Curry Coconut Cream Sauce
Yield: 25 (3 inch round) pieces

Ingredients:

2 cups Split pea (soaked in warm water overnight) (1 pack is equal to 2 cups)
2 Tablespoons cornstarch
½ teaspoon turmeric
½ - 1 teaspoon chili powder (optional)
2 ½ - 3 teaspoons salt
½ teaspoon black pepper
1 pack stevia or 2 teaspoons sugar
*1/2 – 1 cup chopped fresh cilantro leaves (but more is better!)
2 Tablespoons water
oil for frying

Directions:

1. Drain water from soaked split pea. Put into food processor.
    Process until smooth.

2. Mix in all ingredients except water.
3. Lastly add 2 Tablespoons water.
4. Form into   3 inch diameter patties, around 1/3 inch thick. Don’t make it too thick, or
    it won’t be too crunchy.
5. Pan fry till both sides are golden brown.
6. Dip in Easy Curry Coconut Cream Sauce


Easy Curry Coconut Cream Sauce

This sauce is a versatile cream sauce because it goes very well with roti or Indian flat bread , chicken fingers, or with  toasted pita chips.  If you find the recipe too thick, you can use coconut milk instead of cream.  I just love the richness of the cream.


Ingredients:

1 200 ml curry cream tetra pack ( I used Kara brand)
¼ cube chicken bouillon
½ teaspoon curry powder

Directions:

1. In a small pan, heat coconut cream.
2. When  cream it simmering, add chicken bouillon.
    Mix till chicken cube is melted.
3. Add curry powder and mix well.
4. Turn off heat, and pour on serving bowl.


Monday, April 29, 2013

Banana and Egg Pancakes


 Delicious. Healthful—high in protein and fiber. Easy to make. Pantry staple ingredients. Inexpensive.  Kid and elderly friendly food. Gluten and dairy free (for those with allergies). I could go on and on to describe this breakfast (or snack) idea.

When I first saw this recipe on the internet, I was hesitant to try it. I thought it would taste like plain baby food. Well I was not totally wrong—yes it tasted like a kid friendly meal but in a good way.  It is soft and tasty.  Since this is completely flourless, folks on a gluten-free diet will be very happy with this recipe.  For a smooth batter, you can use a blender to liquefy the bananas—that is if you don’t mind washing an extra appliance J.  For a hassle free but a slightly bit more elbow grease style, just mash the bananas with a fork and mix in the beaten egg.  If you want variations to this recipe, you can add a sprinkling of cinnamon or a teaspoon of cocoa powder. Ground flax seeds go unnoticed in this recipe adding more nutrition to the already healthful formula.  There is no exact measurement here because sizes of eggs and bananas vary.  I used one large egg and one medium banana, but you can use 2 eggs plus a medium banana for a high  protein and low carb ratio. Just be patient before flipping these griddle cakes—you have to wait until bubbles sta rt forming on top. You can also make mini versions of this pancake, and make them a grab and go snack.  Such a delicious and healthful snack for those on a diet and even for those who aren’t .  I am happy to share this pancake recipe with you and hope you like it as much as I do. :)

I didn’t put any pancake syrup on top since they are sweet enough to be eaten on their own.  Delicious!

Banana and Egg Pancakes
Yield: Makes 4 (3 inch) pancakes

Ingredients:
1 large egg or 2 small eggs, beaten
1 very ripe banana, mashed
 melted butter or cooking oil

Directions:

1. Mix together the beaten egg and mashed banana. Mix well.
2. Melt some butter or cooking oil in a griddle or non-stick pan over low to medium heat.
3. Pour about  ¼ cup of the mixture.
4. When bubbles form on top, flip over and cook for less than a minute more.
5. Serve with  butter and pancake syrup on top; bacon or sausages on the side if desired.

Garlic Sotanghon


Cooking pancit intimidates me. Yes I could whip up a pasta dish be it cream,  tomato or oil based in a jiffy and produce an instant crowd pleaser. But pancit ? Yikes.  It is the ratio of the noodles, broth or water, and oil that makes me chicken out whenever I think of cooking it.  I’ve had a lot of failed attempts. Too dry? Yes, I’ve ”successfully” done that.  Too watery? Yes, of course! How about being bland and boring? Sure.  Because of my numerous unsuccessful attempts in cooking pancit, I really have developed a certain respect for cafeteria  or carinderia cooks.  Sometimes it is what one assumes to be an easy dish to make  is the one that requires a lot of skill and experience.
Among the various noodles in the market- bihon, canton, and sotangon, it is the latter that is closest to my heart.  My mom used to bring us pancit as pasalubong from an authentic Chinese restaurant somewhere in Blumentritt, Manila. It tasted heavily of the wok taste  common among Chinese dishes, and yes, it was oily.  In rare times, oily can be equal to delicious. Sad but true.  Are you familiar with the type of pancit that some people eat with rice because it was very tasty? Yes, this was what she brought us.  Although I would have loved to experiment with  this  Chinese style pancit , I did not bother to do so because  it involves the use of a  thin aluminum wok plus very high heat to achieve the pleasantly familiar “burnt” wok taste.  I don’t use aluminum pans in my home cooking due to potential health hazards (alzheimers and skin problems anyone?).  I would rather go to an authentic Chinese restaurant and have some of my aluminum wok dishes served to me without my seeing how they were cooked. Maybe what I don’t “see” won’t hurt me. Hehe.

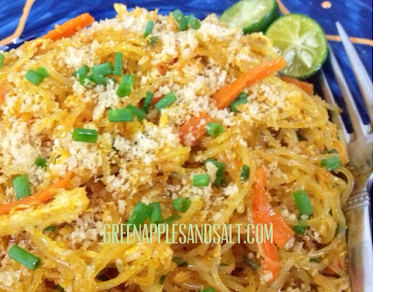
Back to this recipe. This noodle dish does not taste like any of its Chinese counterparts, but it has a well defined garlicky taste that makes you eat almost non-stop.  It goes well with fried chicken, inihaw na liempo, or lumpiang shanghai. It took me several attempts to create a pancit dish with the right amount of liquid and oil, and of course flavor that would be requested again and again.  Even if pancit dishes are notoriously known to spoil easily, this particular pancit dish can be cooked a day ahead. Just cool down to room temperature, then transfer to a sealed container (so that your whole refrigerator won’t smell of garlic).  I bring this to potlucks provided that it travels cold or straight from the refrigerator. Just mix first (some of the oil might settle at the bottom of the container) then reheat a few minutes.  I assure you it won’t turn soggy.

I hope you try making this dish—you won’t regret it.


Garlic Sotanghon
Yield: 4 or 5 servings

Ingredients:

225 grams  (1/2 lb) uncooked sotanghon noodles  (soaked in tap water for 10 minutes,  drained then cut into desired length)
400-500 grams chicken breast (boiled and shredded)
-Save stock to measure 1 1/3 cups ( add water if stock is less than 1 1/3 cups)
½ cup oil (vegetable or palm oil or any regular cooking oil)
2 heads garlic, minced
1 medium onion, chopped
2 tablespoons atsuete powder
½ - ¾  cup carrots, cut into short strips
1 chicken bouillon cube
1 – 2  tablespoon Patis or Fish Sauce
1 teaspoon ground black pepper
green onions/chicharon/extra garlic bits  for garnish  (optional)

Directions:

1. In a large pan, heat oil on low to medium heat.
2. Fry garlic until very light brown.
3. Add onions and sauté until transparent. Lower heat so garlic won’t burn.
4. Add atsuete powder in pan and dissolve well.
5. Add chicken strips, carrots, chicken bouillon, fish sauce, black pepper, 1 1/3 cups
    stock or water.
    Boil mixture on medium to high heat for a minute or until carrots are tender.
6. Add drained sotanghon noodles. Lower heat. Mix gently while simmering,
    approximately 3 – 5 minutes or until almost dry.
7. Garnish with green  onions/crumbled chicharon (pork cracklings)/ more fried garlic
    bits. Enjoy!


Gluten Free Pancakes


 What do Miley Cyrus, Mariel Hemingway and  Spice girl Geri Haliwell have in common? No, its not their million dollar paychecks nor their colorful fashion wardrobe but a gluten intolerance or wheat allergy.  We have all been reading (or hearing) terms such as gluten-free or wheat-free…but let us first understand what it is and all the fuss surrounding it. 

According to Wikipedia, gluten is a protein composite found in foods processed from wheat…..Gluten produces that elastic texture in dough that makes them rise and hold its shape when baking.  It is that chewy texture in bread, pizza, and pastas  that makes them so appealing to eat. Unfortunately for some, gluten produces food sensivity or intolerance. Its symptoms range from frequent head aches,  skin rashes, digestive problems (bloating or excessive gas, diarrhea, and constipation) among others.  Another more serious condition caused by consumption of gluten is Celiac disease. People with Celiac Disease, according to the Mayo Clinic experience an immune reaction in their small intestines causing damage to the inner surface of the small intestine and an inability to absorb certain nutrients. Its symptoms  like diarrhea, abdominal pain, and bloating are very much similar to food intolerance symptoms.  Unfortunately in the Philippines, we  don’t  have a gluten testing facility yet. We can just rely on a trial and error method by avoiding a certain food for a particular time and observe our bodies’ condition.  I am not telling you to be paranoid or what….but if you have an undiagnosed health concern, then you might try giving your diet a change.  Those who have benefited from switching to a gluten free diet are children who have autism.  Jenny McCarthy strongly insists on a gluten free diet for autism. She says  that her son was cured of the disorder. Even Karen Davila swears by a gluten free diet for her son, David, diagnosed with the same condition. Aside from being gluten free, Karen Davila’s son is also under a casein (milk) free diet.

It is believed that going on a gluten free diet whether you have food sensitivities or just want to give your digestive system a break is quite pricey and leaves you with very limited food choices. I think otherwise. One can have fruits and vegetables, legumes, eggs, meat, and rice. With enough planning and preparation, you can serve your family with healthy meals that won’t break your bank account.  As for me, I don’t follow a gluten free diet but I sometimes enjoy giving myself and my family a break from digesting all those protein starches from time to time (thus the presence of other gluten free posts ) …Try this gluten free pancakes made from legume starches or you can opt to have the much easier banana and egg pancakes. You won’t regret it either way. :) 


Gluten Free Pancakes
Yield: 7 or 8 pancakes (5 inch rounds)

Ingredients:

1 cup gluten free flour (I used   Bob’s Red Mill Gluten Free All Purpose Baking Mix 
 available at Healthy Options)
1 small packet stevia (I used Sweet Leaf also available at Healthy Options) or 2 teaspoons sugar) –optional
2 teaspoons baking powder  (I used Bob’s Aluminum free baking powder)
¼ teaspoon salt
¾ cup milk (cow’s milk, almond, rice milk) (I used rice milk available at SM Supermarket)
1 large beaten egg
2 Tablespoons melted butter
extra butter or oil for greasing the pan

Directions:

1. In a large bowl, combine flour, stevia or sugar, baking powder, and salt. Set Aside.
2. In a separate bowl, mix liquid ingredients – the milk, beaten egg, and melted butter.
3. Pour liquid mixture in flour mixture.  Mix until almost no lumps are seen.
4. Heat a little oil or butter in pan (preferably non-stick).
5. Pour a around ¼ cup of the mixture.  I used and ice cream scooper.
5. Flip when bubbles start forming on the pancake.
6. Serve with butter and the classic maple syrup if desired. Top with bananas or other
    fruits for more nutrition.


Kare Kare with Bone Marrow


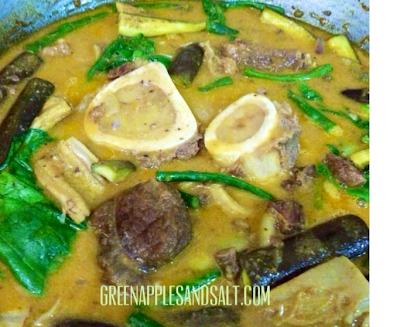
Kare kare is a traditional Filipino stew of a variety of vegetables, oxtail, tripe, and peanut sauce.  Bagoong or fish paste as a condiment  is a must in this fiesta staple food. My sister used to  cook a mean kare kare complete with pig’s intestines….yes, a real-to-die-for-dish…hehe.  Fatness heaven. (Oh,  I love pork intestines..fried  bituka ng  baboy…why so yummy?)  But as age and health concerns creep slowly (or fast), she omitted this artery clogging stuff. Her husband and kids initially complained  but once taught about its evils, they never requested for it again.

With all this talk about the removal of pig’s intestines as an artery clogger, you now wonder why in the world are those conspicuous pieces of marrow smiling at you?...well  according to Dr. Robin Navarro, a cellular and biochemical specialist, bone marrow contains many nutrients that are fabulously fantastic for our health …..It contains the essential fatty acids DHA (docosahexaenoic acid) and EPA (eicosapentaenoic acid) which play big roles in the formation of brain and retinal tissue…Babies (those who are about to be born and need  fetal and neural development) and the elderly (those who need sustenance for cognitive and visual health to avoid the onset of Alzheimer’s disease, other dementia, and visual problems) benefit greatly from bone marrow’s health benefits.

I totally understand if you are hesitant to believe this because I was a skeptic too…I  did my research and begun enjoying it not only in this dish but in bulalo soup as well….I’m still alive and kicking (cholesterol level normal J) and  still (guiltlessly) savoring this fat. 
Of course you may opt to just use the other cuts of meat in this dish. I used  shank, beef cubes or beef ribs, Cook  beef and tripe together in a pressure cooker and you are assured of tender meat.  Don’t forget to use the water (now stock) from the pressure cooker as this is where you will get the most flavor for the dish.  No need to wait for special occasions to enjoy this dish. Easy to make and truly satisfying  whether you decide to include bone marrow or not . J


Kare Kare with Bone Marrow
Yield: 5-6 servings 
Ingredients:

¾  kilo beef shanks, cut into cubes while separating the  bone with marrow
½ kilo tripe
5 clovess garlic, minced
1 large onion, sliced
1 small bunch string beans, cut into 3 inch strips
1 small banana heart (puso ng saging), use inner white part only
2 medium eggplants, cut into 3-4 inch strips ***
1 small bunch pechay leaves
4 cups stock (from boiled beef and tripe)
1 cube beef bouillon
1 Tablespoon atsuete powder dissolved in 2 Tablespoons stock
½ cup creamy peanut butter
2-3 Tablespoons cooking oil for sauteing
bagoong or fish paste

1 Tablespoon cornstarch dissolved in 2 Tablespoons stock (optional)


Directions:

1. In  a pressure cooker, boil beef and tripe together until tender (30-45 minutes  
    depending on beef and tripe toughness).  DO NOT INCLUDE MARROW IN
    PRESSURE COOKER). (Marrow will be cooked later).  Remove from stock. This can
    be done a couple of days ahead or overnight. Just refrigerate or freeze cooked meat.
2. Cut the tripe into 2 - 3 inch squares. Set aside together with the beef cubes.
3. In  a large wok or pan,  heat  oil. Sauté garlic and onions till fragrant. Add beef and
    tripe. Saute for several seconds.
4. Add 4 cups, beef bouillon, atsuete mixture.   When mixture is simmering, add in
    peanut butter and mix well.
5. Increase heat and when mixture is boiling, put in marrow and all vegetables except  
    pechay. When vegetables are almost tender.  (At this point, you may check the marrow   
    if cooked. If cooked, remove from mixture). Add pechay leaves and simmer for 30 
    seconds. 
6. Serve and top with bone marrow. Don’t forget the bagoong! :)


Beef with Kamote Leaves in Oyster Sauce


 My mom has this economical and convenient idea of cooking a large amount of beef cubes and/or beef ribs, then freezing them.  When the need for tender beef cubes is needed, she simple defrosts them (or not) and readily whips up a piping hot beef nilaga or beef sinigang.

But this time, we didn’t have vegetables for a nilaga or sinigang dish, not to mention that one can sometimes be bored with these if eaten often. So now enters the idea of using
what was available at that time. .. Kamote leaves! Yup, the idea of using what was abundantly growing in our garden seemed to be practical, not to mention highly nutritious. Kamote leaves or sweet potato leaves are rich in antioxidants, primarily polyphenolics which protect us from cancer and other diseases. These humble leaves which easily grow in many of our backyards require minimum attention  to grow abundantly.  Picking them straight from our very own backyards guarantees us fresh and 100% pesticide-free leaves.

Instead of  brocolli  with beef, dish, why not use our lowly but nutrient packed kamote leaves in this dish.   This slightly sweet dish (from the oyster sauce) and the mildly peppery taste from the ginger appeal to the young and old alike.  Give it a try, and you might be having this as a staple in your menu.  You could also use kangkong or alugbati leaves. Just a little imagination and creativity can create a dish that is highly palatable and nutritious.  Sprinkle with toasted sesame seeds and you are assured of a high calcium dish.  (Yes, these little seeds are calcium packed.)

Beef with Kamote Leaves in Oyster Sauce
Yield: 4-5 servings

Ingredients:

approximately 2 cups cooked beef cubes, sliced into 11/2 – 2 in cubes
1 bunch kamote leaves
2-3 Tablespoons cooking oil
4 Tablespoons oyster sauce
1-2 Tablespoons light soy sauce
1 Tablespoon sesame oil
¼  – ½ cup beef stock or water
1 Tablespoon or more of toasted sesame seeds
3 cloves garlic, minced
1 small onion sliced thinly
1 Tablespoon ginger, sliced thinly

Directions:

1. In a medium pan with medium heat, saute ginger, garlic and onion.
2. Add cooked beef.  Saute for a minute.
3. Add beef stock or water, oyster sauce, light soy sauce, sesame oil.
4. When mixture is simmering, add in kamote leaves. Gently mix for a few seconds.
5. Turn off heat.
6. Place in serving dish and sprinkle sesame seeds.

Red Velvet Cupcakes


 How can you resist a pretty ruby red cake?  You just can’t. Velvety smooth cake topped with a tangy sweet cream cheese frosting…heaven.  My niece, Natasha has a sweet tooth and a matching empty wallet because of  being a foodie. She keeps on buying any sweet treat that catches her eye but would often rant about how she just wasted her money on an  overpriced yet disappointing baked item. 

Now enters the auntie (yours truly) to appease her niece’s taste buds.…and wallet.  I wanted to surprise her with these cupcakes, yet wanted to avoid the sometimes “F” rating she would give me. Yes, I’ve had many failures in my baking journey..heehee. I wanted a winner this time—literally. I remember watching a Throwdown with Bobby Flay episode about red velvet cupcakes. Terri Wahl’s recipe beat Bobby Flay’s. Hmmmn…..definitely sounded like the recipe I was searching for.

Being  both a foodie and health nut , I was hesitant to use  big amounts of red food coloring which was almost equivalent to one  small bottle. What the heck—if  a pretty cake is what I want to achieve,  then  a bottle of red food color it shall be. Note to self: a little extra food coloring in my system (or my niece’s) won’t kill me.  the next  time I baked this, I made sure to cut the red coloring in half.  I probably made the second batch on a night with a  full moon because sometimes, the health nut in me wins ( hah!) :) With half the  amount of  red color, the cupcakes turned out to be  less vibrant  but equally delicious.  If you are making this for the first time, I suggest going all out with the red food color –just to see and experience the love color in all its glory. 

With all my fuss about the red food color, I really believe that the flavor of these red velvet cupcakes depends on the frosting. The cake itself is all about texture and color—the frosting, all about flavor.  You would notice that there is only a cup of powdered sugar on the frosting recipe.  This minimum amount of sugar together with the butter and cream cheese produces  the subtly tangy sweet flavor  that marries well with the velvety smoothness of the cake.  

Red Velvet Cupcakes 
(adapted from Terri Wahl’s recipe
Yield: 14 cupcakes

Ingredients:

1 ¾ cup all purpose flour minus a teaspoon (217 grams)
(Weigh if you have a measuring scale)
½ teaspoon plus 1/8 teaspoon Salt
½ teaspoon plus 1/8 teaspoon Baking Soda
1 teaspoon unsweetened cocoa powder
¾ cup Palm or Vegetable Oil
1 cup minus 1 Tablespoon Granulated White Sugar (182 grams)
*1/2 cup plus 2 Tablespoons Buttermilk
1 large Egg plus 2 Tablespoons beaten Egg
1 Tablespoon plus 1 teaspoon Red Food Coloring
½ teaspoon plus 1/8 teaspoon Vinegar
½ teaspoon plus 1/8 teaspoon Vanilla
1 Tablespoon Water

*Make Buttermilk:
Mix ½ cup Fresh Milk plus 2 Tablespoons milk with 2 teaspoons of  White Vinegar.
Set aside for 5 minutes for the milk to curdle.


Directions:

1. Preheat oven at 350 F.
2. Sift together the flour, salt, baking soda, and cocoa powder in a bowl. Set aside.
3.  Beat oil, sugar, and buttermilk with an electric mixer until well combined.
    (If you don’t have a mixer, just beat vigorously using a wooden spoon.)
4.  Add in eggs, food color, vinegar, vanilla, and water. Mix well.
5. Remove bowl from mixer. Add dry ingredients a little at a time, and mix gently by
    hand. Use a wooden spoon or a large rubber spatula to mix ingredients. Do not
    over mix. Over mixing will produce a tough and rubbery cupcake.
6.  Using an ice cream scooper, pour the batter into 14 lined cupcake or muffin tins.
7.  Bake for 15-17 minutes or until toothpick inserted in the middle comes out clean.
8.  Remove from pan, and let cool on wire rack. 
     Cool completely before frosting.


Not So Sweet Cream Cheese Frosting

Ingredients:

170 grams Cream Cheese, room temperature
110 grams Butter, room temperature
100 grams Powdered Sugar, sifted
¾ teaspoon Vanilla

Directions:

1. Mix  butter and cream cheese together in a mixer fitted with a paddle attachment until
    smooth.  Again, they have to be at room temperature for easy mixing!
     (If you don’t have a mixer, use a wooden spoon and mix by hand.)
2. Gradually add powdered sugar to the mixture. Scrape down the bowl as needed.
3. Add in the vanilla.  Mix well.


Sunday, April 28, 2013

Oatmeal Cookie Bites


Everyone loves homemade cookies, especially chewy bite sized nibbles. These are not just delicious but  are also gluten free for those who are gluten sensitive, or just for those who want to try eating gluten free sometimes for whatever health reason.  These cookies are made from  finely ground oats which makes them extra chewy.  If one is also on a casein free diet, just replace the milk chocolate with an equal amount of nuts or raisins.  What I like about this recipe is that you don’t have to go to a special health food store for the ingredients.  Non-dairy milk such as rice milk or almond milk is available at big supermarkets nowadays.   I suggest doubling the recipe because they disappear quickly on hungry little (or big ;) ) mouths.

If you have older children, you can make this uncomplicated  recipe with them.  It would be a great idea to let them know  at an early age what goes into a healthful cookie. Might be a bit  messier to bake with kids but  the priceless bonding will be worth it.
With all the  good nutrition in these cookies: soluble fiber from oats and B vitamins  and minerals such as potassium and zinc from coconut sugar and antioxidants from raisins, you won’t feel guilty serving these treats to your loved ones or to yourself : ).  These are also low in sugar.  Enjoy munching without the guilt!


Oatmeal Cookie Bites
Based on a recipe by Katie
Yield- 20 bite sized cookies (1 ½ in each)

Ingredients:

140 grams oat flour  (grind rolled oats in blender or food processor)
½ teaspoon salt
½ teaspoon baking soda
¼ cup chocolate chips or cubed milk chocolate bar
¼ cup raisins
2 Tablespoons Coconut sugar or brown sugar or muscovado sugar
2 Tablespoons melted butter
½ teaspoon vanilla
2 Tablespoons milk (I used coconut milk for drinking but you can use almond milk, rice milk, or cow’s milk)


Directions:

1. Preheat oven at 375 F
2. Mix  oat flour, salt, and baking soda in a bowl. Set aside.
3. In a separate bowl, mix melted butter, vanilla, milk, and sugar.
4. Stir in chocolate chips and raisins. Batter will be thick.
5. Form into 1 ½ inch balls  on an ungreased pan. (Doesn’t matter if you line them with
    parchment paper or not)
6. Bake for 6 minutes for a soft chewy  cookie or bake for 7-10 minutes for  a crispy cookie. 
    Cool before munching on them. 


Beef and Vegetable Samosas


I’m in love with Indian food.  I adore the use of spices in such quantity and with such vivid imagination.  Indian food with its variety of spices is not just a gustatory delight, but is also of great mystical interest.  Entering an Indian restaurant gives you a peek of India’s history and culture with its rich and exotic interiors.  Even streamlined Indian restaurants show subtle hints of  a  unique and exciting culture just by  simply using intricate wall paper.  Unfortunately, Indian cuisine unlike Thai, Japanese, and of course Chinese cuisine is not that popular yet in Metro Manila.  I live in the North, and chances of finding a good Indian restaurant is like finding a needle in the haystack. Luckily for me, my Indian food craving can easily be subsided by an easy to make yet richly spiced Beef and Vegetable Samosas.

Traditional Indian Samosas are crispy triangle parcels of spiced potatoes and peas, and or ground beef. They are made with pastry dough and formed into triangles.  I find it easier and more convenient to use lumpia wrappers and wrapping them into classic rectangular shapes. It doesn’t matter which way you shape them—what matters is the explosion of flavors in your mouth. Flavorful Indian  spices  such as coriander, cumin, turmeric, and chili  are absorbed by the soft and almost mushy potatoes.  Flavorful and crunchy, these treats are going to be a welcome addition to your daily eats or special occasions.   No need to go to an Indian specialty store because these spices are readily available at big supermarkets.  You can make it completely vegetarian by replacing the meat with a couple more of potatoes. Prefer a fiery version? Just add more chili powder.


Wrapped and uncooked samosas freeze well for several months.  No need to thaw before frying.   Serve with the familiar sweet chili sauce, tangy tamarind sauce (I found this at SM...just add a little sugar into it),  or plain creamy yoghurt.  You may even want to  serve these Indian goodies with  two or three  of these sauces for a variety of flavors. These samosas are ideal for appetizers, snacks, side dishes, and are a meal by itself.

Beef and Vegetable Samosas (Lumpia style)
Yield: 40 (3 inch) pieces

Ingredients:

1 ½ cups cubed potatoes (1/2 in cubes), boiled till tender
1 ½  teaspoons cumin
½ teaspoon turmeric
1 teaspoon ground coriander
1 inch grated ginger
1 medium onion, diced
2 cloves garlic, minced
¼ kilo ground beef
1 cup green peas
¼ cup (or more!) chopped coriander (cilantro) leaves
5 x 5 lumpia wrappers (about 40 pieces)


Directions:

1. Heat in a medium pan (big enough to fill all the ingredients), all the spices-cumin,
    turmeric, and coriander for a couple of minutes until fragrant.
2. Add 2 Tablespoons oil, then add the ginger. Saute for a few minutes.  Add garlic and
   onion. Mix well.
3. Mix in beef, and cook till beef is no longer pink.
4. Add in cubed cooked potatoes. Season with salt and pepper. Toss in  fresh  coriander
    leaves. Cool mixture before wrapping in lumpia wrappers.
5. Get a piece of lumpia wrapper and put 1 tablespoon of the filling. Wrap lumpia style.
6. Heat some oil, and fry until golden brown. Remember that the filling is already
    cooked. You just need to brown the wrappers.  Turn once to brown the other side.
7.  Serve with desired sauce.


Squash Soup with Crab Stick and Corn


Squash or Kalabasa as what we Filipinos call it is a highly nutritious plant which is readily available in local markets or supermarkets all year round. Although we think of it as a vegetable, squash is really a fruit because it came from the plant’s seed itself. With its affordability and availability in the Philippines, why not use it beyond our traditional pinakbet or ginataang kalabasa dishes? By using it more often in our everyday meals, we can be assured of meals with  high levels of vitamin A (better eyesight), folate (prevention of birth defects), vitamin C (stronger immune system), not to mention other valuable antioxidants  vital to our bodies.

If you are tired of  your everyday meals, try making squash into soup.  Just throw in whatever vegetable, meat, or seafood that you have.  You won’t be needing any fancy equipment here, not even your old trusty blender. …Yup, this means no gadget or appliance to clean. Even a blender sometimes can be tiresome to clean especially when added to your pile of “basic” pans and plates J. This recipe freezes well—just hold off the milk or cream until serving time.

Kids will love this sunny colored creamy soup while the adults and the elderly will love its nutritional benefits. Try this recipe and watch it be immediately gobbled up.


Squash Soup with Crab stick and Corn
Yield: 4 cups

Ingredients:

  • 500 grams squash (cut into cubes and boiled in 1 ½  to 2 cups water, mashed with a fork  together with boiling liquid)
  • 100 grams crabstick (about 7 pieces)
  • half a can of corn kernels
  • 2 garlic cloves, minced
  • 1 medium onion diced
  • 1 chicken cube or  (½ chicken cube plus 1 Tablespoon fish sauce)
  • 2 tablespoons butter
  • ¼ cup evaporated milk or cream (optional)
  • salt and pepper to taste

  • 1 Tablespoon cornstarch dissolved in ¼ cup water (tap water)(optional)


Directions:

1. Over low heat, melt butter in a medium pan.
2. Saute garlic and onions until onion are transparent.
3. Pour in mashed squash together with the water boiled in it.  
    Increase heat and allow to simmer.
4. Add in chicken cube and or fish sauce. Mix well. Add salt and pepper to
    taste.
5. Throw in some crab sticks and corn kernels. Simmer a few minutes until
    crab sticks are thoroughly heated. (You can also opt to just top the soup
    with crab sticks and corn kernels.
6. If mixture is not thick enough, add cornstarch dissolved in water and
    simmer again for 5 minutes.
7. If using milk or cream, add now and simmer for a few seconds.


Fudgy Chocolate Crinkles


Chocolate crinkles are fudgy chocolate cookies coated in confectioner’s sugar. These crackled-looking cookies are a favorite during Christmas because of their snowy appearance.  The melt in your mouth chocolatey goodness also makes them popular all year round.

This recipe uses vegetable oil or palm oil which makes the cookies fudgier than making them with butter. Also, when eaten cold straight from the refrigerator, these  cookies  transform into  such comforting delights.  They don’t harden but just firm up into the right soft, chewy, and fudgy texture that make them so addicting.

The secret here is not to over mix the cookie dough.  You also have to refrigerate the dough, or better yet freeze the dough overnight so the dough is thoroughly chilled.  By doing so, the center of the cookie would remain fudgy.  You might find this recipe a bit messy to make, but I assure you that it is worth ever hassle. Use plastic gloves when forming the dough into balls.

I sold a lot  of chocolate crinkles using the exact recipe many years ago. I have scaled down the ingredients --I’m pretty sure you won’t be interested in making  hundreds of cookies from a single recipe no matter how yummy they are.  Since this was once a commercial recipe producing hundreds of cookies, most of the ingredients were weighed.  You will be needing a weighing scale for this. 

Chocolate Crinkles

Ingredients:

250 grams all purpose flour
250 grams light brown sugar
125 ml vegetable or palm oil
¼ teaspoon salt
4 large eggs
70 grams dutch processed (alkalized) cocoa powder
 (I used Bensdorp. Dutche brand is also fine)
20 grams regular cocoa powder ( I used  Peotraco)
30 grams baking powder
¼ teaspoon baking soda
*confectioner’s sugar or powdered sugar for rolling

Directions:

1. Sift together all purpose flour, baking soda, baking powder, and salt in a bowl.
    Mix well. Set aside.
2. In a heavy duty mixer with paddle attachment and in medium speed, combine sugar  
    and oil. Mix well.
3.  At low speed, Add in cocoa powder. Blend thoroughly.
4.  Increase speed, and beat in eggs one at a time.
5.  Mix in flour mixture in 3 to 4 batches at low speed. Don’t over mix.
6.  Cover with plastic wrap.  Freeze overnight.
7.  Preheat oven to 350 F.
8.  Form dough into 1 inch balls, and roll in powdered sugar.
9.  Put on parchment lined baking sheets, 2 inches part.
10. Bake for 8-10 minutes. Don’t over bake.
11. Immediately transfer to wire racks to cool. Enjoy!